The best bagels outside of NYC, made in your own oven, in less time than it would take to fly there to get them in person.

Growing up in NYC makes you love bagels. There used to be a law up there that you had to eat a bagel at least once a week, but I think that’s been changed. Now it’s twice a week,
But, alas, like many of our memories of childhood, those bagels are rather unobtainable, because in some leap of idiocy, I moved away. So, now, having not found a suitable substitute, I have learned to make my own. And it’s the proudest I have been in the kitchen.
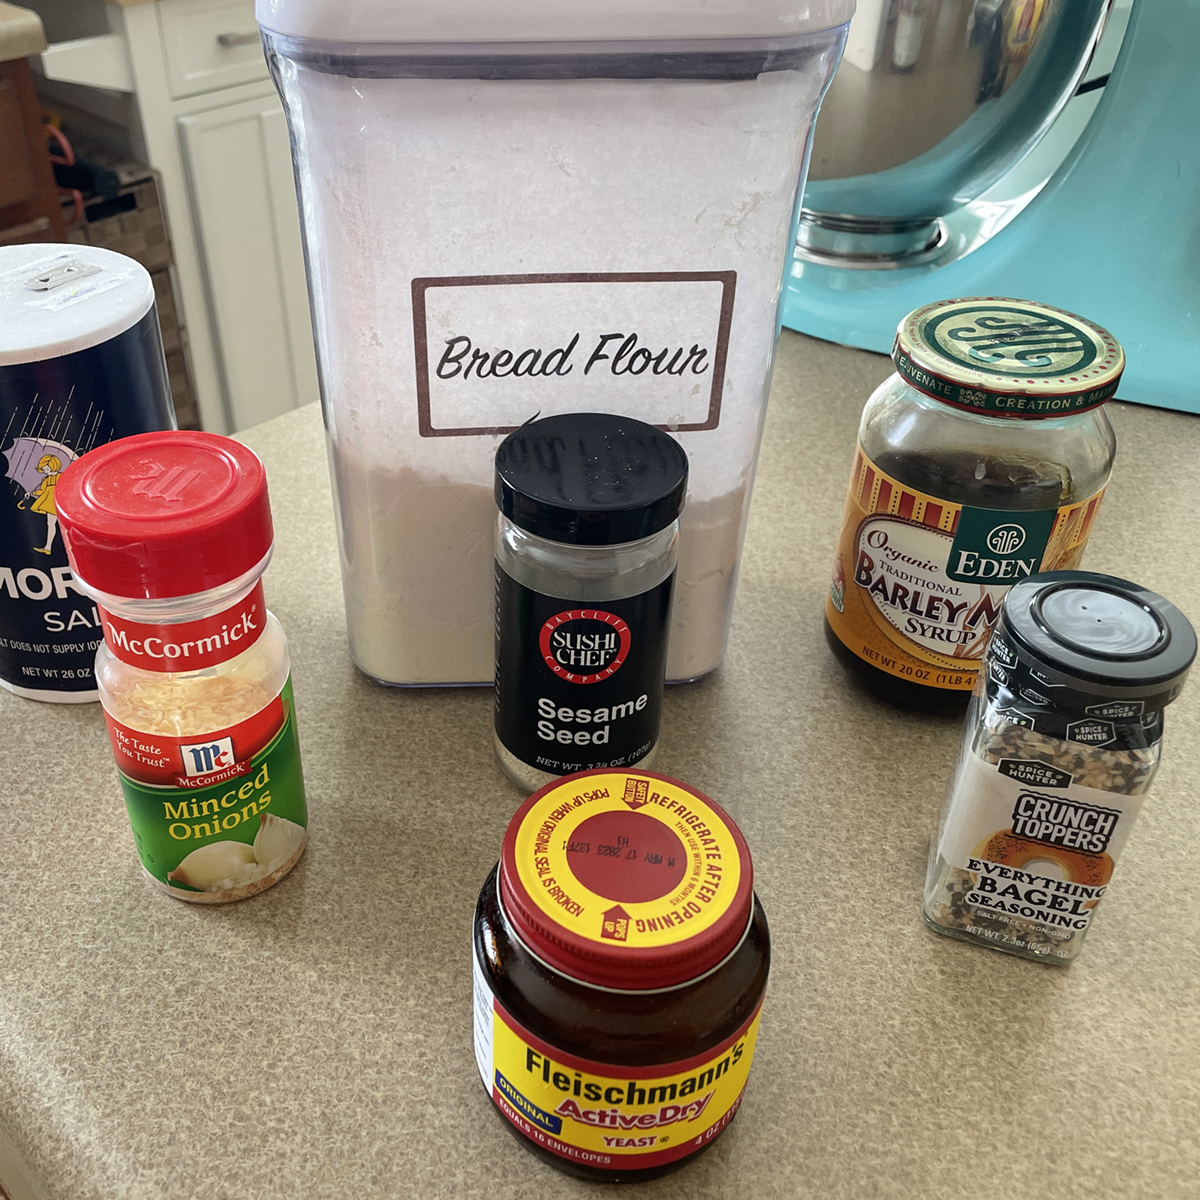
INGREDIENTS
I started with The Bread Bible, by Rose Levy Beranbaum. But the whole process took too long and involved a sponge, and so, using the same ingredients and methods, I’ve settled on this recipe. You can knead these by hand the whole time, or you can use a mixer. If you don’t have a mixer, when you get to the kneading part, knead for a full 10 minutes by hand, but I gotta tell you, you need a darn mixer in your house. One with a dough hook would be nice. That said, don’t let me shame you for not having one. Hands worked for centuries before somebody harnessed electricity.
THE STUFF YOU NEED
- Yeast
- Barley Malt
- Warm Water
- Bread Flour
- Salt
- Toppings like Everything Seasoning, Onion Flakes, Sesame Seeds, and stuff.
THE WAY YOU DO IT
Here are the steps you take: proof the yeast in the warm water, with the barley malt. Put dry ingredients left into mixing bowl. Pour wet stuff into dry stuff. Mix in mixer. Dump it out on counter, knead it for a sec. Put in a bowl and let rise for an hour. Punch it once. Break it into pieces. Poke holes in ‘em. Stretch ‘em like Stretch Armstrong. Boil, sprinkle, and bake.
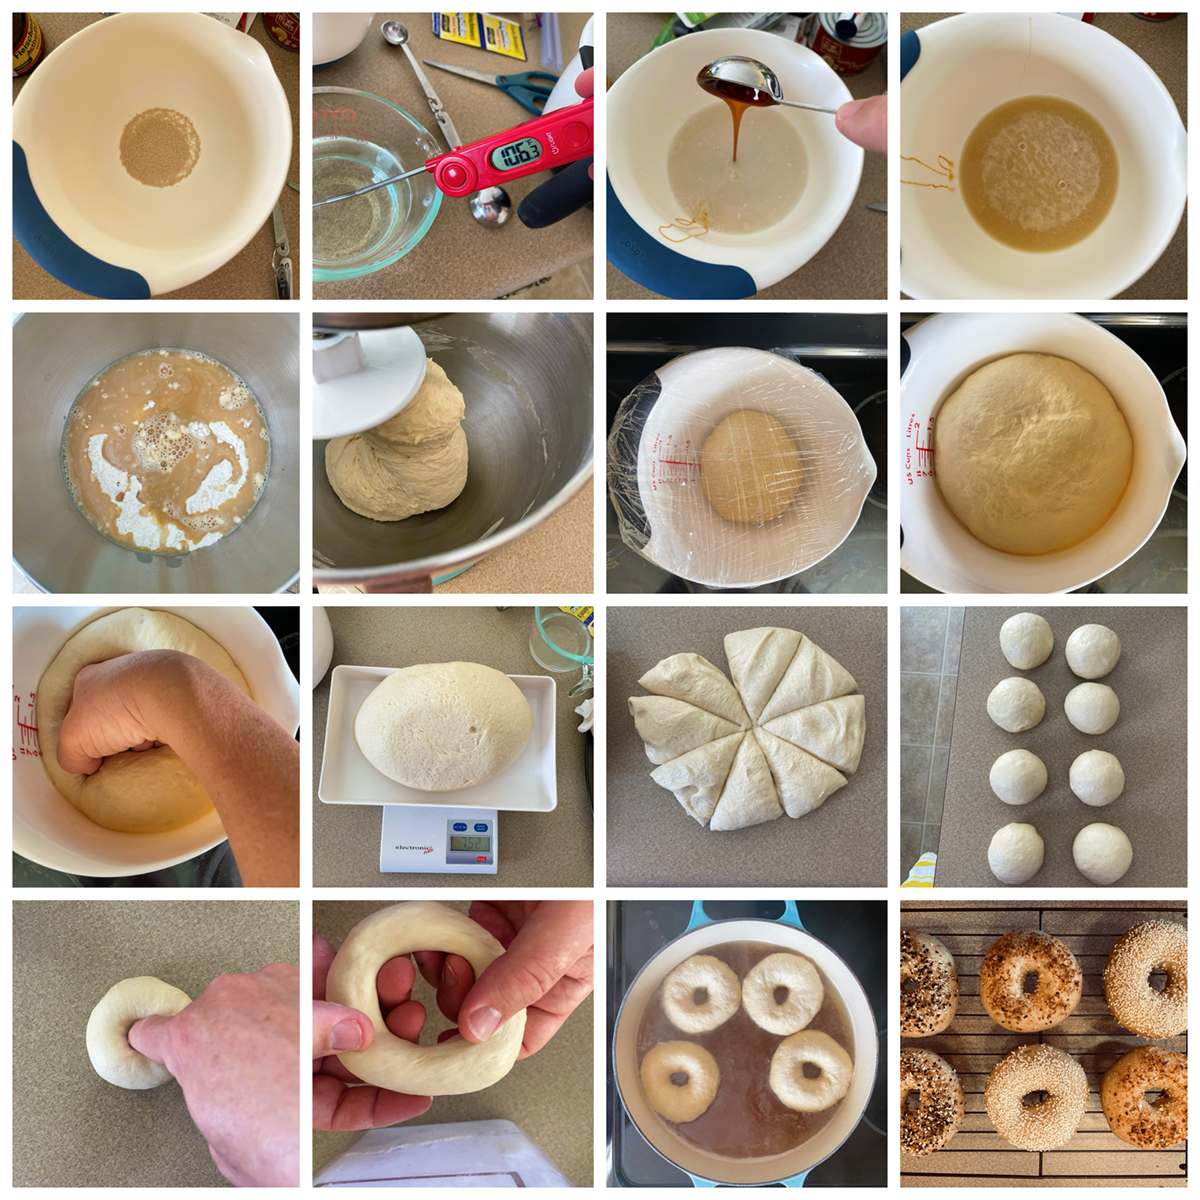
GET THAT YEAST A GROWIN’

It’s the same with pretty much all bread recipes. In this one, using an instant read thermometer get 1 ¼ cups of water at around 105-110 degrees, and pour it into a bowl with the 2 teaspoons of yeast. Drizzle and stir in 2 tablespoons of Barley Malt, which you really need to find. They have it at Whole Foods, and I think I’ve seen it at Wegmans, but for sure you can find it on Amazon, because Amazon delivers! Give it a good stir, and wait 5 minutes. Watch it bubble and grow. Or watch this time-lapse video, which is better.
THE DRY INGREDIENTS
In the mixer, put 3 ½ cups of bread flour (I measure that as 440 grams), and 2 teaspoons of salt. There that wasn’t hard was it?
MIX LIKE A PRO
Now, pour that yeasty mixture into the middle of the dry ingredients and set the mixer on low. Let it run for about 15 minutes.
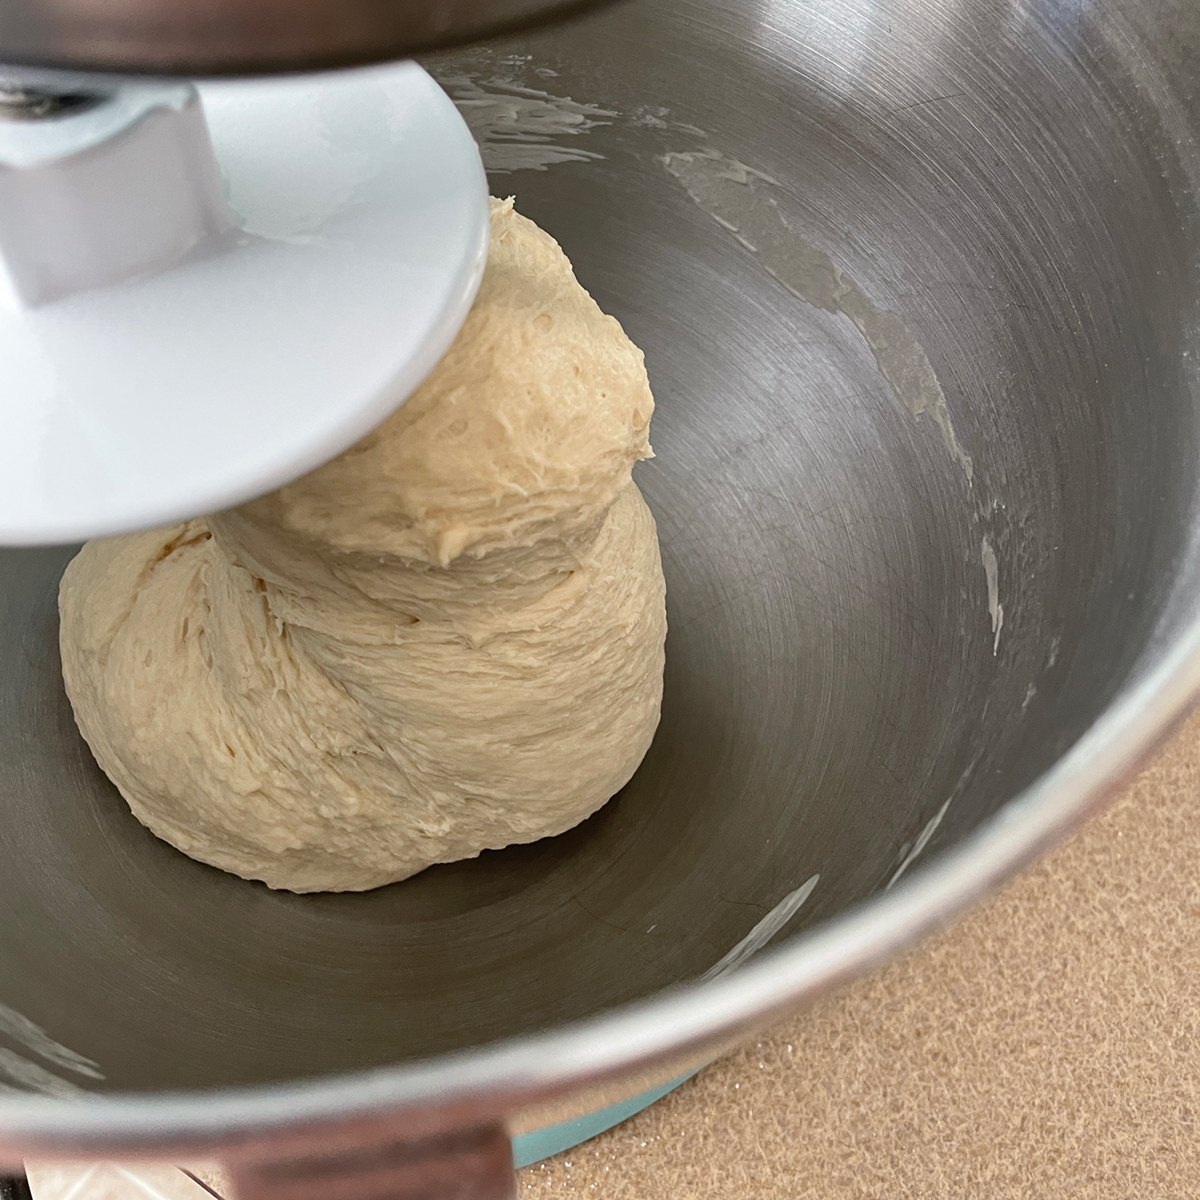
Then dump it out onto the counter, and give it a minute or so of kneading by hand, and then form it into a ball, and roll it around in a very lightly oiled bowl. Cover tightly with plastic wrap, or if you’re like me, stretch that obnoxious wrap the best you can, then ball it up and throw it away and just cover the whole thing with a towel. Place the bowl in a warm place to rise for an hour.


AFTER THE RISE
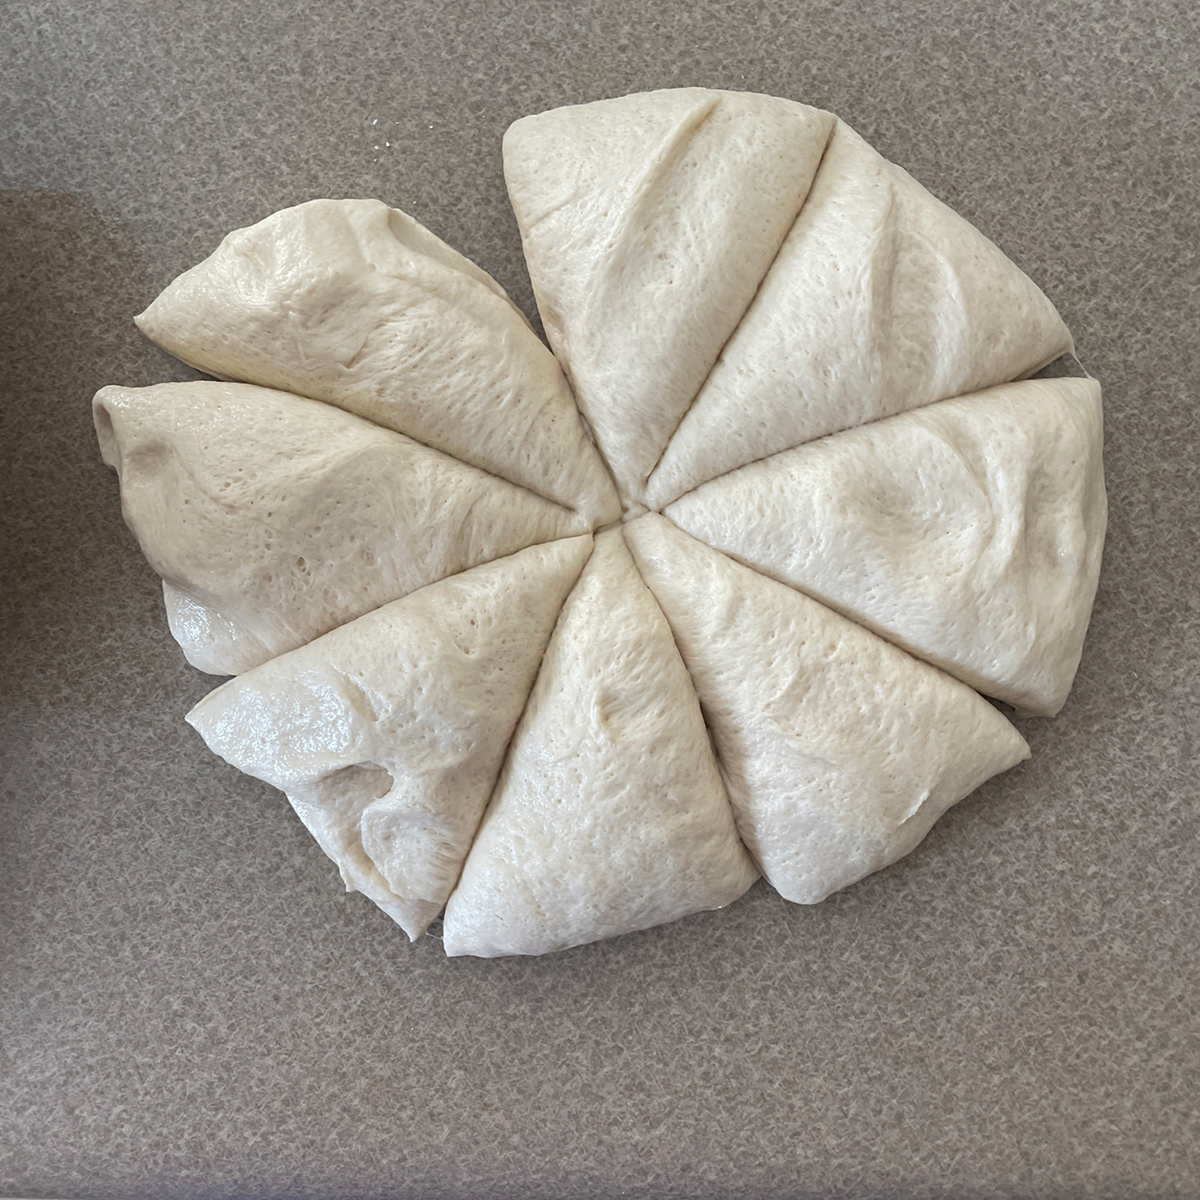
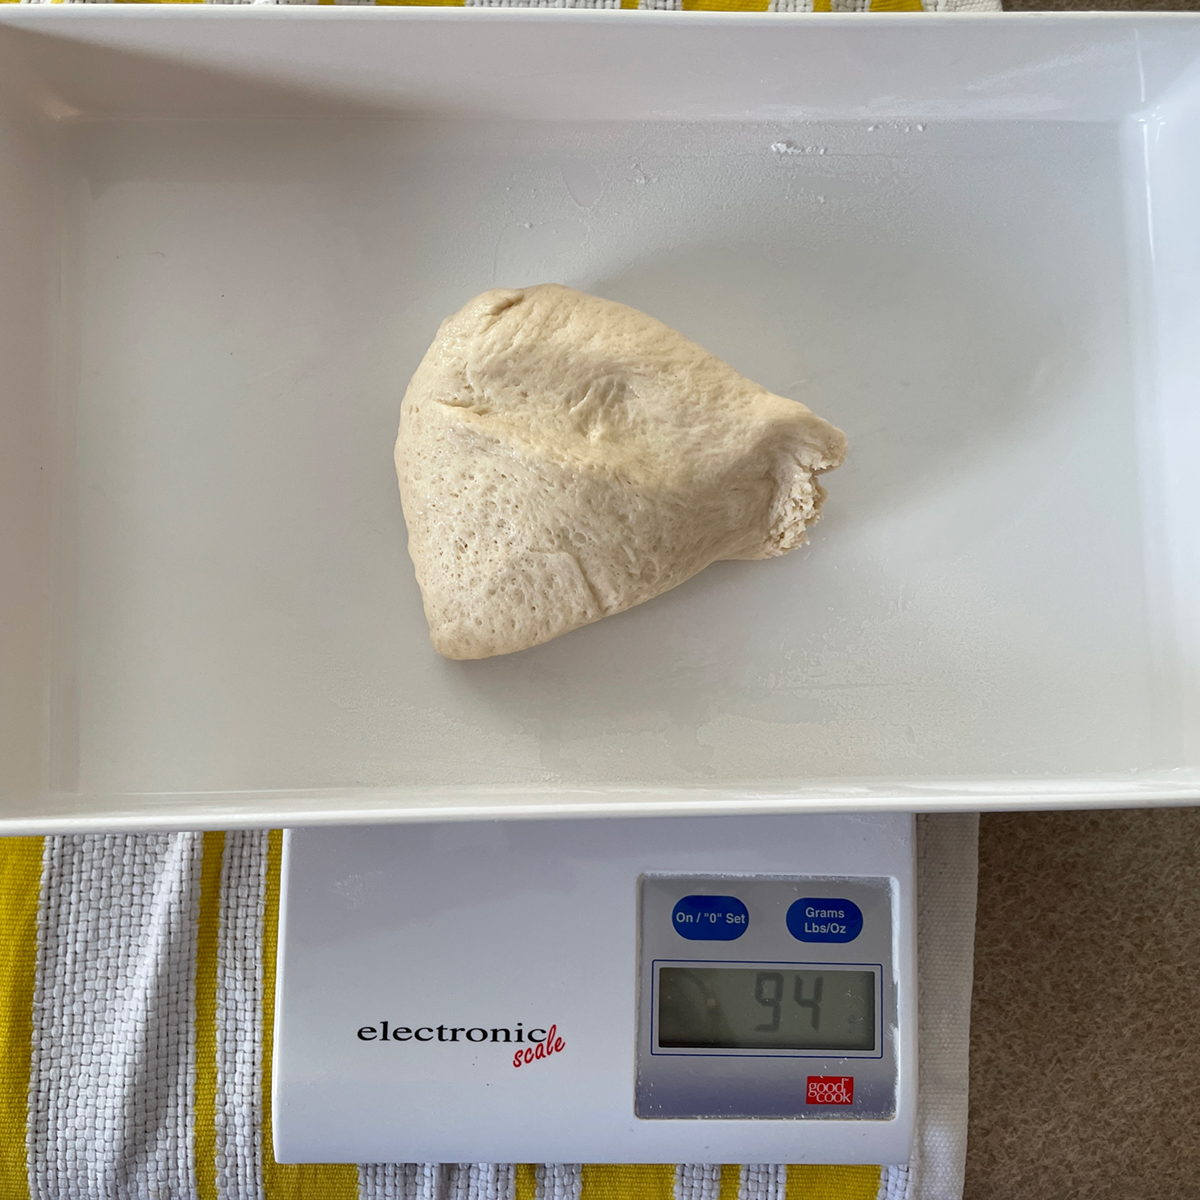
Once the dough has risen to new heights, give it a good couple of punches in the middle to deflate it, and let it sit for a few minutes…maybe 10. At this point I get out a scale, because my idea of equally sized balls of dough is rather uneven. I weigh the whole dough mass, divide by 8, and then cut the dough into roughly 8 even pieces. Then, weighing each one, I pick a piece off or add a piece from another one until they are all very close to the same weight. A better person could do this by sight. I think my last ones were about 96 grams apiece.

A WET KITCHEN TOWEL AND SOME RELAXATION
You don’t want these balls to dry out, so what you do is dampen a kitchen towel, and as each one is weighed, pop it under the damp towel. Then one by one take each one out and make it into a perfect little ball by using the “Roll that dough in your cupped hand against the counter” method, as they call it officially. IT IS VERY IMPORTANT TO NOT HAVE ANY FLOUR ON THE COUNTER when you do this, or the dough balls won’t stick to the counter enough to form a smooth ball. Place each one back under the damp towel. Now, let those balls of potential bagels sit there for ten minutes to relax, which is important so that they get a little stretchier. While this is going on, you can clean up your mess.

PREP YOUR PANS AND POT
Get out a couple of baking sheets, and spray them with some cooking spray. Enough that they won’t stick because if they stick, your bagels are gonna look like a third grader made them.
Then, preheat your oven to 425 degrees. And before you get too far ahead of yourself, fill a large pot about ¾ of the way up with water, and when it comes to a boil, add the final 2 tablespoons of barley malt syrup, stir, and reduce to a far from raging simmer. Again, too rapid a boil and you end up with third grader looking bagels.
Now it’s time to get shaping.
MAKING THEM ALL BAGELLY LOOKING

The Beranbaum cookbook tells of the shaping method the bakers in New York use. Since I don’t do this every day, I’m using the finger poke method. Put one of the dough balls on the counter, stick your finger tip into some flour, and then poke it through the middle of the dough ball. Then carefully stretch the hole until it’s about two thirds of the size of the ball. You should have a doughnut looking ring now.

Place it on the greased cookie sheet, and continue until you have done them all. I use two cookie sheets and put four on each, because they rise a good bit and I don’t want them to stick together. See above note about the third grader. Cover with the wet towel, and let rise for 10 minutes or so. During THIS 10 minutes go ahead and take another cookie sheet and cover it with parchment. Hell, better do two. This is a four cookie sheet deal here.

Take your first four over to the slowly simmering pot of water, and gently drop them in. I do two – four at a time. You might be more adventurous. After 30 seconds use a spatula to flip them over, and let simmer for another 30 seconds.

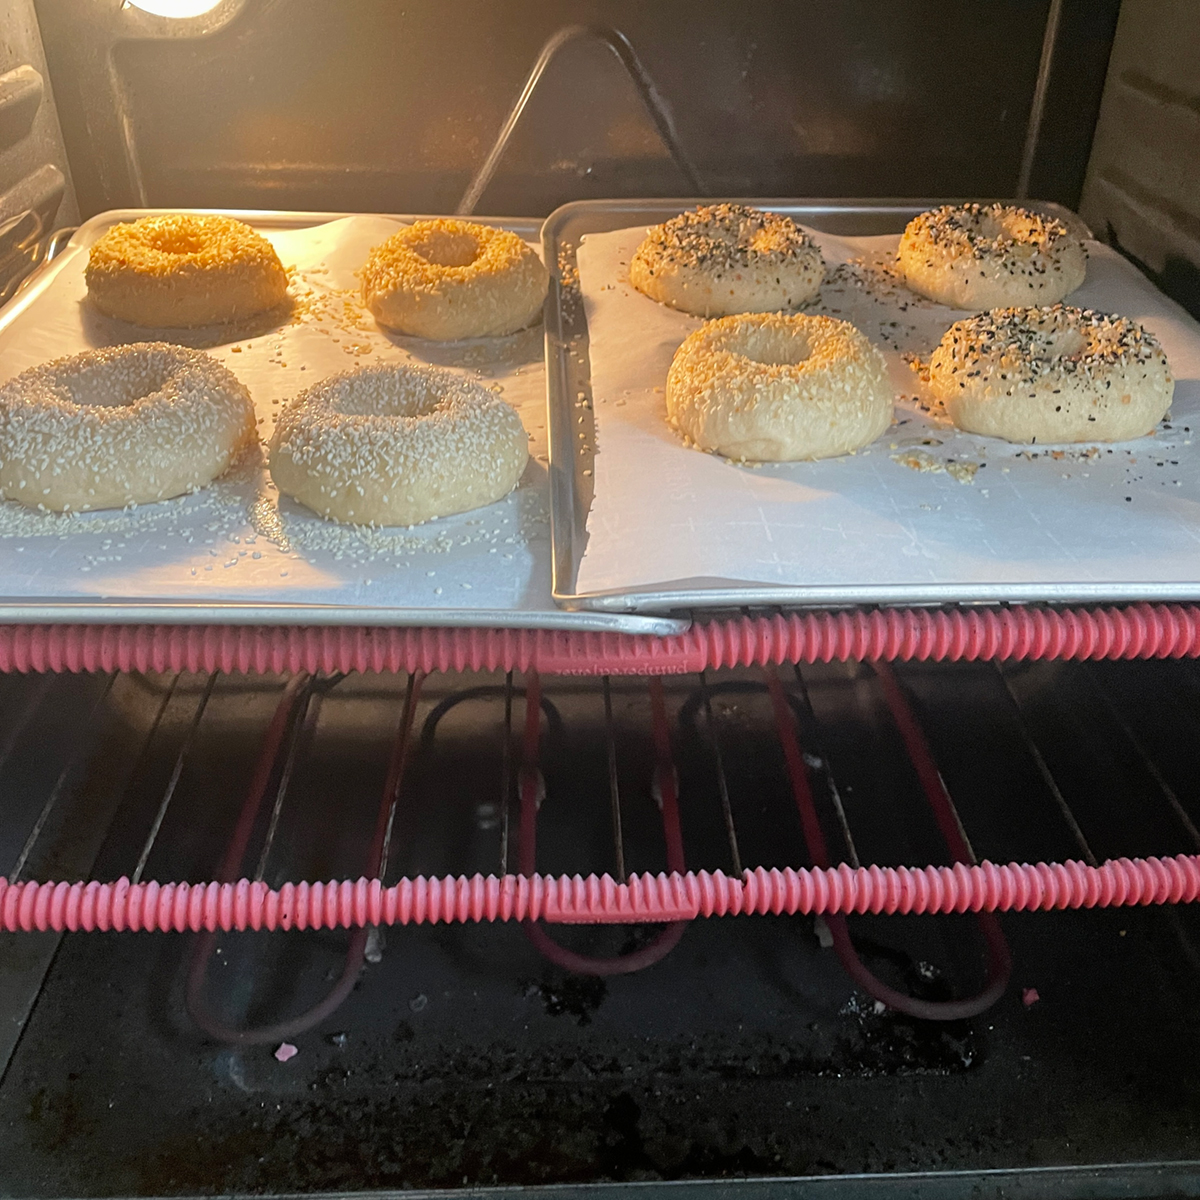
Lift them up from the water, making sure the nice looking side is on top, let them drip for a second and place down on the parchment papered pan. Quickly sprinkle with the topping of your choice. Continue with all the rest of the bagels until they are all boiled and topped.
THE BAKING
Place the pans in the oven, and bake for approximately 20 minutes.
Remove them from the oven, and move them over to some sort of baking rack so that they can cool. You want that flow of air underneath. After you have taken all of that wonderful scent that you can take, you can break down, cut one in half, toast that sucker up, and slather whatever you want on it. It will have a light crunch on the outside, and a nice chewiness on the inside. And it won’t pull out all your teeth like those ones in NYC do.
Send pictures to your friends, or to us, here in the comments.

HOMEMADE BAGELS
- Total Time: 2:20
- Yield: 8
Description
A fantastic bagel that will take you back to New York, whether you’ve ever been there or not.
Ingredients
- 440 grams bread flour (about 3 1/2 cups)
- 2 teaspoons active dry yeast
- 1 1/4 cup warm water (b/w 105°- 109°F
- 1 1/2 teaspoons salt
- 1/2 tablespoon oil for bowl
- Toppings such as Everything Seasoning, Dried Onion, Sesame Seeds
Instructions
- Place 2 teaspoons active dry yeast in the bottom of a medium sized bowl, and add the 1 1/4 cup of warm water and 1 tablespoon of barley malt syrup.
- Mix until combined, and then let sit for 5 minutes for the yeast to feed on the sugars and grow. You will see it reacting.
- In the bowl of your stand mixer, or another bowl, if kneading by hand, add the 440 grams bread flour and 1 1/2 teaspoons salt
- Mix these together and then pour in the yeast and water mixture. Put the dough hook on the mixer.
- Turn the mixer on low, and let it mix for about 5 minutes. Turn off the mixer, unwrap all the dough from the dough hook, and continue mixing for another 10 minutes on a slightly higher speed, or until the dough looks smooth. I like to remove the dough from the hook a few times during this process. The dough will be cohesive, but a bit sticky.
- On an extremely lightly floured. or unfloured, countertop, knead the dough for about 1 more minute until it is smooth and elastic, and makes a nice looking dough ball.
- Lightly brush a large bowl with the 1/2 tablespoon oil and turn the dough to get it completely coated.
- Cover the bowl with plastic wrap or a damp dish towel. Let rise in a warm place for 1 hour, until the dough has roughly doubled in size. Punch the dough down, and let it rest for another 10 minutes.
- Carefully divide the dough into 8 pieces (I used a scale to be extra precise, but it’s not necessary). My dough weighed 752 grams, so I made 8 balls of dough that were 94g each. Yours should be roughly the same weight.
- Shape each piece into a ball, pinching the bottoms of each piece of dough together. As you form each one, place them under a damp towel so that the outside doesn’t dry out. Then, one by one, take a dough ball and press it gently against the countertop (or whatever work surface you’re using) moving your cupped hand and the ball in a circular motion until the ball looks perfect. Let these balls of dough sit under the damp towel for about five – ten minutes to relax before beginning the next step.
- Preheat the oven to 425°, and place a large pot of water on the stove. When it reaches the boil, add 2 tablespoons of barley malt syrup stir, and lower the water to a slight simmer. Too much water activity will make your bagel ugly.
- To form the bagel itself, coat a finger in flour, and gently press your finger into the center of each dough ball. Stretch the ball with your hands, gently pulling the ring wider and wider, until it’s about ⅓ the diameter of the bagel and place on a lightly oiled cookie sheet. It will spring back a bit, but that’s ok. Do this to each ball of dough, until all eight bagel rings are laid out. Do not let them touch, or you will have a mess on your hands if you do.
- After shaping the bagels and placing them on the cookie sheet, cover with a damp kitchen towel and allow to rest for 10 minutes.
- Gently pick up and lower, one at a time, each bagel into the water. Simmer as many as you are comfortable with at a time. I do no more than 4 at once. As soon as 30 seconds has passed, use a spatula to flip over each bagel, and let them simmer for 30 more seconds on the other side. Flip them one last time to get the pretty side on the top then remove the bagels with a spatula and place them on a baking sheet covered with parchment paper, and sprinkle liberally with the seasonings of your choice. How many you can fit on one baking sheet depends upon how brave you are.
- Bake for roughly 15-20 minutes, or until golden brown (I usually check to see that the toppings aren’t burning, and take them out before that happens).
- Cool on a wire rack. The kitchen is going to smell like a bagel shop. Hold out until they have cooled. Then cut one in half, place it in the toaster, and slather it with the toppings of your choice.
- They will last a couple of days in a paper bag, and while they will get harder each day, carefully cutting them and toasting them will leave you with a bagel just like the ones you dreamed of ever since moving away from wherever you used to get them.
- Prep Time: 2 hrs. (Incl. 1 hr rise time)
- Cook Time: 20 minutes
- Category: Bread
- Method: Baking
Keywords: Bagel, Bread
Great bagels and easy to make. One question can you let the rise overnight in the fridge and make the next day
★★★★★
I have never tried that. That’s a great experiment though.